Today we will divy into dispatch source, first of all let’s specify what Dipatch::Source stands for. A dispatch source is a Grand Central Dispatch (GCD) data structure that you create to process system-related events.

In Other Words:

Dispatch::Source are used to monitor a variety of system objects and events including file descriptors, mach ports, processes, virtual filesystem nodes, signal delivery and timers.

When a state change occurs, the dispatch source will be submit its event handler block to its target queue.

Dispatch::Source.new

Methods in Dispatch::Source class:

All the Dispatch::Source types have the same initialization scheme:

- new(type, handle, mask, queue) { ... } -> Source
    - [PARAM] type:
        - The type of the dispatch source.
    - [PARAM] handle:
        - The handle to monitor. If passeed `DATA_ADD` or `DATA_OR` 
        in type, specify the `0` in this argument.
    - [PARAM] mask:
        - The mask of flags.
    - [PARAM] queue:
        - The dispatch queue to which the event handler block is submitted.
    - [RETURN]
        - Returns a Dispatch::Source instance.

Well there is no rule without exception, in this case the exception is Dispatch::Source.timer

- timer(delay, interval, leeway, queue) { ... } -> Source
    - [PARAM] delay:
        - The start time of the timer.
    - [PARAM] interval:
        - The second interval for the timer.
    - [PARAM] leeway:
        - The amount of time, in seconds, that the system can defer the timer.
    - [PARAM] queue:
        - The dispatch queue to which the event handler block is submitted.
    - [RETURN]
        - Returns a Dispatch::Source instance.

Just like Dispatch::Queue, Dispatch::Source also can be cancelled and tested if they are cancelled:

- cancel!
    - Asynchronously cancels the dispatch source, preventing any 
    further of invocation of its event passed block

- cancelled? -> bool
    - [RETURN]
        - Returns a `true` if cancelled, otherwise `false`.

Other implemented Methods are:

- handle
    - [RETURN]
        - Returns the underlying Ruby handle for the dispatch source.
- mask
    - [RETURN]
        - Returns returns the set of flags that were specified at source 
        creation time via the mask argument.
- data
    - [RETURN]
        - Returns the currently pending data for the dispatch source.

DISPATCH SOURCE TYPES

Grand Central Dispatch (GCD) comes with 11 different type of Dispatch::Sources and at the moment only 8 are accessible to [MacRury][macrury] and RubyMotion.

  • IMPLEMENTED
    • Dispatch::Source::DATA_ADD
    • Dispatch::Source::DATA_OR
    • Dispatch::Source::Timer
    • Dispatch::Source::PROC
    • Dispatch::Source::READ
    • Dispatch::Source::WRITE
    • Dispatch::Source::SIGNAL
    • Dispatch::Source::VNODE

  • NOT IMPLEMENTED
    • Dispatch::Source::MACH_SEND
    • Dispatch::Source::MACH_RECV
    • Dispatch::Source::MEMORYPRESSURE

1. Dispatch::Source::DATA_ADD and Dispatch::Source::DATA_OR

Both Sources allow applications to manually trigger the source’s event action vai a call of Dispatch::Source#<<. The Data will be merged to with the source’s pending data via an atomic add or logic OR depending on the source type. the operation will happen within the target queue.

Dispatch::Source::DATA_ADD
1
2
3
4
5
6
progress = Progress.new
queue = Dispatch::Queue.new('source add example')
source = Dispatch::Source.new(Dispatch::Source::DATA_ADD, 0, 0, queue) do |src|
  progress.increment src.data
end
Dispatch::Queue.concurrent.apply(1000) { |idx| sleep 0.1; source << 1 }

explanation: the above example increment our progress object, eventhought the numbers are generated concurrently the source will make it synchrone, so that are no ThreadSafe progress doesn’t blows our intentions.

2. Dispatch::Source::Timer

Dispatch::Source::Timer
1
2
3
4
queue = Dispatch::Queue.new 'example.timer'
timer = Dispatch::Source.timer(0.5, 1, 0.5, queue) do |s|
  puts "Wake up!"
end

explanation: The Above source is a timer which get called every 1 second, but it has a leeway of 0.5 second, which means it may sometimes be called with a max interval of 1.5 seconds. The leeway is the torance.

3. Dispatch::Source::PROC

This type of sources monitpr procesdses state changes, the handle is the process identifier of the monitored process and te mask may be one or more of the following flags:

Flag Meaning
Dispatch::Source::PROC_EXIT The process has exited and is available to wait
Dispatch::Source::PROC_FORK The process has created one or more child processes.
Dispatch::Source::PROC_EXEC The process has become another executable image.
Dispatch::Source::PROC_SIGNAL A Unix signal was delivered to the process.

How to use it?

Dispatch::Source::PROC
1
2
3
4
5
6
7
8
9
10
# Monitoring the death of a process
queue = Dispatch::Queue.new('Proc')
itunes = NSRunningApplication.runningApplicationsWithBundleIdentifier 'com.apple.iTunes'
return if itunes.empty?
pid = itunes.first.processIdentifier
opts = Dispatch::Source::PROC_EXIT
 # will observe safari, whenever it quits the action block will be called
Dispatch::Source.new(Dispatch::Source::PROC, pid, opts, queue) do |src|
  NSLog("%@, iTunes quit", src.mask) # 2147483648, iTunes quit
end

explanation: On our example, we observer a iTunes Process, the block is called whenever the application is quited.

4. Dispatch::Source::READ

Dispatch::Source::READ
1
2
3
4
5
6
7
8
9
10
filename = 'PATH/file2read.txt'
@result = ""
read_queue = Dispatch::Queue.new "read source queue"
@src = Dispatch::Source.new(Dispatch::Source::READ, file, 0, read_queue) do |src|
begin
    @result << @file.read(s.data) # ideally should read_nonblock
 rescue Exception => error
    puts error
  end
end

explanation: The above Source read the content of our file filename asynchronously, the content of the file will be copy in our @result variable.

5. Dispatch::Source::WRITE

Dispatch::Source::WRITE
1
2
3
4
5
6
7
8
9
10
11
12
13
14
15
path = 'PATH/hello.txt'
filename = File.new(path, File::WRONLY|File::CREAT|File::TRUNC, 0644)
@msg = "#{$$}: #{Time.now} queue%s"
@pos = 0
writer = Dispatch::Source.new(Dispatch::Source::WRITE, fd, 0, queue) do |src|
  file = src.handle
  begin
    npos = @pos + src.data - 1
    msg = @msg % Dispatch::Queue.current
    file.write("#{msg[@pos..npos]}") # ideally should write_nonblock
    @pos = npos + 1
  rescue Exception => error
    puts error
  end
end

explanation: The above Source writes the content of the variable @msg asynchronously to the file filename.

6. Dispatch::Source::VNODE

Flag Meaning
Dispatch::Source::VNODE_WRITE The process has exited and is available to wait
Dispatch::Source::VNODE_DELETE The process has become another executable image.
Dispatch::Source::VNODE_EXTEND The process has created one or more child processes.
Dispatch::Source::VNODE_RENAME The process has become another executable image.
Dispatch::Source::VNODE_ATTRIB The process has become another executable image.
Dispatch::Source::VNODE_REVOKE The process has become another executable image.
Dispatch::Source::VNODE_LINK The process has become another executable image.
Dispatch::Source::VNODE
1
2
3
4
5
6
7
8
9
10
11
12
13
14
O_EVTONLY = 0x8000
queue = Dispatch::Queue.new 'example.vnode'
type  = Dispatch::Source::VNODE
opts  = Dispatch::Source::VNODE_WRITE | Dispatch::Source::VNODE_DELETE
dirPath = '/Desktion/dir'
fd = open(path, O_EVTONLY)
Dispatch::Source.new(type, dirPath, opts, queue) do |src|
  data = src.data
  if data == Dispatch::Source::VNODE_WRITE
    puts "changed directory data"
  elsif data == Dispatch::Source::VNODE_DELETE
    puts 'The directory has been deleted.'
  end
end

explanation: The above Source observes the directory dirPath, whenever the content of the directory changes (write or deleted), the source triggers it block.

As you can see, GCD is a mighty tool and it dvantages is concurrency and Asynchronousity. Whenever you have to get critical tasks done, you should consider GCD.

This is the last part of the GCD Series. The coming posts will cover other topics. I hope you enjoyed it.
Sources:

Until now whenever we used wanted to layout views on Rubymotion or MacRuby we harcoded the size and position of the UI elements. To achieve a little of dynamic we used the old style auto resizing masking. With this article you’ll get basic knowledge about the Cocoa/CocoaTouch Auto Layout architecture. For more on this topic you’re strongly encouraged to check the sources¹.

The Auto Layout system let use defining layout constraints for the user interface elements, these constraints represent relationship between user interface elemets such as “these views line up head to tail” or “this button should move with this split view subview”. When laying out the user interface, a constraint satisfaction system arranges the elements in a way that most closely meets the constraints. if you configure constraints that the system cannot be satisfy, an exception is thrown.

What are constraints?

Constraints are rules for layout elements in your user interface. For example the help you to specify the a text label should be centered on its superview and keep the same proportional to its superview even though the superview sizes changed. Let’s illustrate it by real life scenario: - Localization example (image) - Auto Rotation example (image)

Constraints themselves are objects, actually instances of NSLayoutConstraint that you can install on views objects (instance of UIView on iOS 6 or Instace of NSView on Mac OS X ≥ 10.7) Typically, you specify the constraints in Interface Builder, well but you and and me can do it better :-), we will create it programmatically by using an ASCII-art² inspired format string and by using a form that looks very much like an linear equations³:

pseudocode:

  • H:|-[input_field]-[action_button]-|


  • view1.attr1 < relation > view2.attr2 * multiplier + constant
1
2
3
4
5
6
7
8
# view1.width == 0.5 * view2.width + 0
NSLayoutConstraint.constraintWithItem(view1,
                            attribute: NSLayoutAttributeWidth,
                            relatedBy: NSLayoutRelationEqual,
                               toItem: view2,
                            attribute: NSLayoutAttributeWidth,
                           multiplier: 0.5,
                             constant: 0)

what we want to achieve:


Explanation:

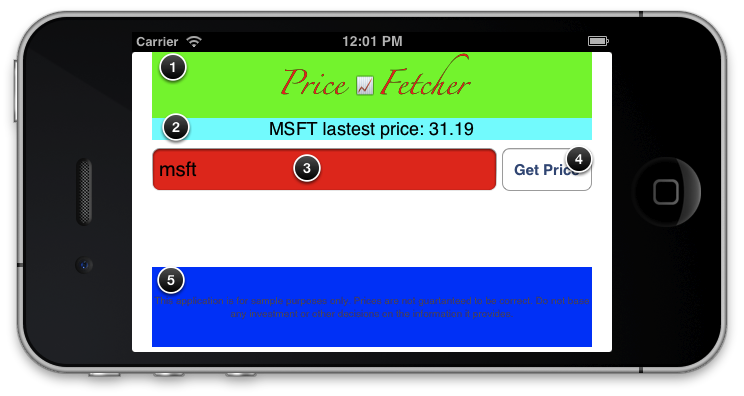
We have a UIViewcontroller with 5 subviews: 1. UILabel: (Title label) should be directed attached to the top of it superview 2. UILabel: (subtitle label) should be direct attached to the bottom of the title label 3. UITextField: (Symbol input field) the input field is placed 5pts from the bottom of the subtitle label 4. UIButton: the (action button) is direct attached to the right size of the input text. 5. UILabel: (disclaimer label), it’s bottom side is placed 5 pts above the bottom of the superview. we want that all this relationship remains, don’t matter how the superview ratio changes.

how does it looks like in code?

Discover if a number is primeSource article
1
2
3
4
5
6
7
8
9
10
11
12
13
14
15
16
17
18
19
20
21
22
23
24
25
26
27
28
29
30
31
32
33
34
35
36
37
38
39
# first of all we need an hash with our views and the name that we want to use tho refer them 
views_dict = {
  "title_label" => @title_label,
  "subtitle_label" => @subtitle_label,
  "button_action" => @button_action,
  "text_field" => @text_field,
  "info_label" => @info_label
}
# we create two constraints: 
# First row with the title_label
constraints = NSLayoutConstraint.constraintsWithVisualFormat("H:|-[title_label]-|",
                                                    options: 0,
                                                    metrics: nil,
                                                      views: views_dict)
self.view.addConstraints(constraints)
# second row with the subtitle_label
self.view.addConstraints(NSLayoutConstraint.constraintsWithVisualFormat("H:|-[subtitle_label]-|",
                                                                options: 0,
                                                                metrics: nil,
                                                                  views: views_dict))
# third row with an infolabel centered
self.view.addConstraints(NSLayoutConstraint.constraintsWithVisualFormat("H:|-[info_label]-|",
                                                              options: 0,
                                                              metrics: nil,
                                                              views: views_dict))

metrics = {"width" => 100, "height"=> 80 }
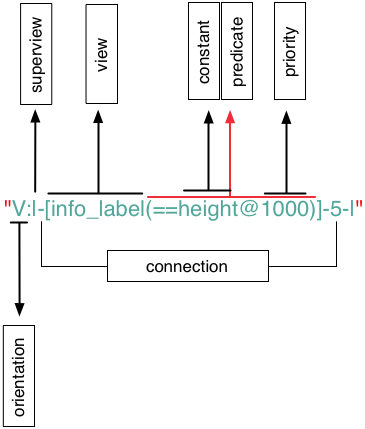
self.view.addConstraints(NSLayoutConstraint.constraintsWithVisualFormat("V:[info_label(==height@1000)]-5-|",
                                                                  options: 0, #  
                                                                  metrics: metrics,
                                                                    views: views_dict))
# @button_action.width == 0.5 * @text_field.width + 0
self.view.addConstraint(NSLayoutConstraint.constraintWithItem(@button_action,
                                                    attribute: NSLayoutAttributeWidth,
                                                    relatedBy: NSLayoutRelationEqual,
                                                       toItem: @text_field,
                                                    attribute: NSLayoutAttributeWidth,
                                                   multiplier: 0.5,
                                                     constant: 0))

Final result:


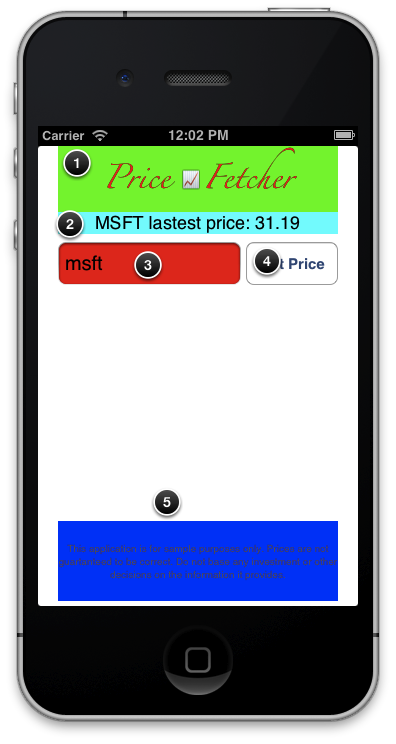
This code might work on all devices the same [iphone, retina iphone and iphone 5] the example code on github include some localization tweaks, it shows what are the benifits of autolayout for localization and other stuffs.

Sources:

- Cocoa Autolayout WWDC 2011 video
- Cocoa Auto Layout Guide
- Beginning Auto Layout in iOS 6: Part 1 / 2
- Beginning Auto Layout in iOS 6: Part 2 / 2
- WWDC 2012: Best Practices for Mastering Auto Layout

This is the third part of a serie of four blog articles on how to use Grand Central Dispatch with Macruby and rubymotion, today I want to Introduce you to tDispatch Semaphores.

Understanding and using Dispatch Semaphores

Dispatch semaphore is GCD’s implementations of traditional counting semaphore not to be confused whit Ruby’s Mutex which only implements a simple semaphore lock but also allows coordinated access to shared data from multiple Threads. Traditional semaphores always require calling down to the kernel to test the semaphore, but the dispatch semaphore tests semaphore in user space, and only traps into the kernel when the test fails and needs to block the thread, this makes Dispatch Semaphore efficient and lightweight.

A Dispatch Semaphore object on mainly responds to two methods:

- semaphore#signal
- semaphore#wait()

*-When a semaphore is signaled, the counter is incremented. When the thread waits in a semaphore, it will block, if necessary until is greater than 0 and then decrement the count.

Let’s look into some code for better understanding: On This example I’ll try to solve the ”The Dining Philosophers Problem” which is an example problem often used in concurrent algorithm design to illustrate synchronization issues and techniques for resolving them.

The Problem

The dining philosophers problem is invented by E. W. Dijkstra. Imagine that five philosophers who spend their lives just thinking and easting. In the middle of the dining room is a circular table with five chairs. The table has a big plate of spaghetti. However, there are only five chopsticks available, as shown in the following figure. Each philosopher thinks. When he gets hungry, he sits down and picks up the two chopsticks that are closest to him. If a philosopher can pick up both chopsticks, he eats for a while. when a philosopher finishes eating, he puts down the chopsticks and starts to think more information.

On this example the Chopsticks are our Infinite resource each philosopher has one, but to eat he needs two, whenever a philosopher picks a chopsticks he send a wait, and when he is done the send a signal to wake the others waiting for the chopsticks.

Let’s take a look into how semaphores really work:

1
2
3
4
5
6
7
8
9
10
# we create an semaphore with the number of resources available: 1
semaphore = Dispatch::Semaphore.new(1)

# Increment the counting semaphore. If the previous value was less than zero, 
# this function wakes a thread currently waiting in semaphore#wait
semaphore.signal

# Decrement the counting semaphore. If the resulting value is less than zero, 
# this function waits in FIFO order for a signal to occur before returning.
semaphore.wait(time) # time can be Dispatch::TIME_FOREVER or Dispatch::TIME_NOW 

Another example sleeping barber problem

As you can see, Dispatch Semaphore is great way to control limited resource, this are basically the fundamental usage of dispatch semaphore. On the last blog post of this serie I’ll show the principles of Dispatch Source.

Coming next

Dispatch Source

Recommendation:

- Apple’s Concurrency Programming Guide

Today we will dinner with GCD Group and barriers features. This article assumes you have already read my previous article Getting Started With GCD in MacRuby & Rubymotion.

Now that we know how to use Grand Central Dispatch to make our application concurrent and parallel, this time I’ll try to show you how GCD makes it easier for us to syncronize blocks and queue tasks.

A dispatch group is a way to monitor a set of block objects for completion. (You can monitor the blocks synchronously or asynchronously depending on your needs.) Groups provide a useful synchronization mechanism for code that depends on the completion of other tasks. Dispatch::Group acts more or less like Thread#join in plain ruby.

Let’s look at some examples to figure out how how Dispatch::Group works:

On this example, Derpina will wait till Derp is back from the kitchen to press the play button. You don’t have to use two queues, both tasks could be executed on the same queue.

How useful are groups on GCD? well let’s take a look into another example, do you know how difficult is to implement Promises and Futures in plain Ruby? well this is how you can implement in MacRuby or Rubymotion:

1
2
3
4
5
6
7
8
9
10
11
12
13
14
15
16
17
include Dispatch
class Future
  def initialize(&block)
    # Each thread gets its own FIFO queue upon which we will dispatch
    # the delayed computation passed in the &block variable.
    Thread.current[:futures] ||= Queue.new("org.macruby.futures-#{Thread.current.object_id}")
    @group = Group.new
    # Asynchronously dispatch the future to the thread-local queue.
    Thread.current[:futures].async(@group) { @value = block.call }
  end
  def value
    # Wait for the computation to finish. If it has already finished, then
    # just return the value in question.
    @group.wait
    @value
  end
end

Now it’s easy to schedule long-running tasks in the background:

1
2
3
4
5
6
7
some_result = Future.new do
  p 'Engaging delayed computation!'
  sleep 2.5
  :done # Your result would go here.
end

p some_result.value

this example is brought to you by patrickt (Patrick Thomson) and benstiglitz (Benjamin Stiglitz)

Barriers

I think we have enough of groups, now let’s take a look into something new, barrier were introduced with OS X Lion and iOS 5. Barriers are a specialized version of the Dispatch::Queue#async method. When a block enqueued with barrier_async reaches the front of a private concurrent queue, it waits until all other enqueued blocks to finish executing, at which point the block is executed. No blocks submitted after a call to barrier_async will be executed until the enqueued block finishes. It returns immediately (from Macruby Source code) If the provided queue is not a concurrent private queue, this function behaves identically to the #async function.

let’s look into some code:

Dispatch::Queue#barrier_async
1
2
3
4
5
6
queue = Dispatch::Queue.concurrent('com.company.application.task')
@i = ""
queue.async { @i += 'a' }
queue.async { @i += 'b' }
queue.barrier_async { @i += 'c' }
p @i #=> either prints out 'abc' or 'bac'

When should we use #barrier_async ? Well barrier_async are pretty useful for example to manipulate data structures which can be read but not written concurrently.

There is a second barrier method, which blocks until the provided task or block is executed. e.g.:

Dispatch::Queue#barrier_sync
1
2
3
4
5
6
queue = Dispatch::Queue.concurrent('com.company.application.task')
@i = ""
queue.async { @i += 'a' }
queue.async { @i += 'b' }
queue.barrier_sync { @i += 'c' } # blocks
p @i #=> either prints out 'abc' or 'bac'

more barrier example inspired by Mike Ash Let’s imagine that we have a Hash that’s being used as a cache. Hash is thread safe for reading, but doesn’t allow any concurrent access while modifying its contents, not even if the other access is simple reading.”

1
2
3
4
5
6
7
8
9
10
11
12
13
14
15
16
17
18
19
20
21
22
23
24
25
26
27
28
29
30
31
framework 'Foundation'

class Cache
  def initialize
    @cache = Hash.new
    @queue = Dispatch::Queue.concurrent('com.company.application.cache')
  end

  def []=(key, value)
    @queue.barrier_async{ @cache[key] = value }  # GCD Version
    #@cache[key] = value                         # Ruby Version
  end

  def [](key)
    @queue.sync { return @cache[key] }         # GCD Version
    #@cache[key]                                 # Ruby Version
  end

  def inspect
    @cache
  end
end

cache = Cache.new
list = File.read("/usr/share/dict/words").split.select{ |word| word[0,1].downcase == "a" }

# cocoa's concurrent enumeration of NSArray
list.enumerateObjectsWithOptions(NSEnumerationConcurrent, usingBlock:-> word, idx, stop {
  cache[idx.to_s] = word
  p cache[idx.to_s]
})

To have a better understanding, you should try both versions out (GCD and Ruby Version) one of them will hang, unfortunately the actual MacRuby version is not compiled on Mac OS X Lion, so Dispatch::Queue#barrier_async is not availible, but you can compile it yourself… or ask me on twitter, if I can send you an installer package ;-)

Final

Since one of biggest difference between Android and iOS application is the UI responsiveness, I hope this motivates you to use GCD to improving the user experience of your rubymotion application.

Coming next

Dispatch Semaphore

Dispatch Source

Recommendation:

- Apple’s Concurrency Programming Guide

Grand Central Dispatch

Grand Central Dispatch is the apple way to perform concurrent programming, by using it you’re able to divide your program into peaces tasks that can be executed by a queue concurrently or serially. Since GCD is a low level C API, you can’t communicate directly with it, but MacRuby has a wrapper for that.

What are Queues?

You can think of Dispatch::Queues as workers waiting to execute undefined tasks, the can either execute tasks concurrently or serially. A Serial Queue executes a single task at once, a concurrent queue is capable to execute as many tasks simultaneously as your system allow it execute.

Creating and Managing Queues:

GCD comes with three different types of queues:
1) The Main queue: the main queue is the application aka. main thread, you can get this queue by using:

get the man queue
1
main_queue = Dispatch::Queue.main

2) Global / Concurrents queue: on pre Lion / iOS5 version of GCD there were only one concurrent queue that could have three defined priorities, but now this changed. You can create as much concurrent queues as you want that execute multiple blocks at the same time¹.

Get / Create Concurrent queues
1
2
3
4
# get the global concurrent queue on 10.6 OSX [priority can be :high, :low or :default]
queue = Dispatch::Queue.concurrent(priority=:default)
# On Lion or iOS5 
queue = Dispatch::Queue.concurrent("com.company.application.tasks")

3) Customized queues: are lightweight list of blocks which can be executed one at a time in FIFO order, they can be compared with Ruby mutex or traditional ruby thread. They are perfectly suited for synchronization mechanism without have to deal with lock and unlock.² If you want to ensure that tasks execute in a predictable order, you should use the customized queues.

Create a custom Queue
1
queue = Dispatch::Queue.new("com.company.application.task")

Submitting blocks to queues:

There are two ways to submit a block to a queue, the first is the asynchronous execution, which submits a block to a queue and returns immediately. e.g:

1
2
queue = Dispatch::Queue.concurrent('com.company.app.task')
queue.async { puts :hallo }

The second method is the Dispatch::Queue#sync which submits a block on a dispatch queue and waits until that block completes. Unlike the Dispatch::Queue#async method, the block are synchronously executed. e.g:

1
2
queue = Dispatch::Queue.concurrent('com.company.app.task')
queue.async { puts :hallo }

Submitting blocks later:

Dispatch::Queue#after submits a block asynchronously to the given queue after the given delay (in seconds) is passed.

1
queue.after(0.5) { puts 'waiting for the world to change' }

Concurrently executing one block many times

Dispatch::Queue#apply submits a block to a dispatch queue for multiple execution, if the execution queue is a concurrent, the block will be executed concurrently.

1
2
3
4
queue = Dispatch::Queue.concurrent('com.company.app.task')
@result = []
queue.apply(5) {|idx| @result[idx] = idx*idx }
p @result  #=> [0, 1, 4, 9, 16]

Managing Dispatch Objects

Dispatch Objects allow to manage the blocks execution by canceling, suspend and resume it.

Suspending and resuming execution:

suspending and resuming execution
1
2
3
4
5
queue = Dispatch::Queue.new('com.company.app.task')
queue.async { sleep 1; puts :hallo }
queue.suspend!
queue.suspended?
queue.resume!

Getting the internal Queue Object:

Sometimes when dealing with Cocoa / CocoaTouch API’s you will need to have access to the Queue object, for this purpose Macruby’s GDC-Wrapper delievers a method to get the queue object: Dispatch::Queue#dispatch_object

Dispatch Constants

Dispatch::TIME_FOREVER: means infinity, queue or semaphore will wait till blocks are done
Dispatch::TIME_NOW: means zero, queue or semaphore will not wait for blocks at all

Coming next

Dispatch Barrier

Dispatch Group

Dispatch Semaphore

Dispatch Source

Recommendation:

- An Introduction to GCD with MacRuby by Patrick Thomson
-Intro to Grand Central Dispatch, Part I: Basics and Dispatch Queues by Mike Ash

¹ Concurrently executed blocks may complete out of order
² the queue names/labels are meant to help you debugging your application, and it should follow the reverse-DNS style convention

Welcome to my Mateus’ Welt, from now on I’ll post article and some MacRuby tricks. If you’re interested on writing a guest post for this Blog, you’re welcome!